


| Step 1: Press the Menu Button |  |
| Step 2: Select the System settings option. |  |
| Step 3: In the following screen, make sure Wi-Fi is switched off. Wi-Fi and internet dongle cannot be operated simultaneously |  |
| Step 4: Now click on More option |  |
| Step 5: Now connect the USB Dongle to ME U1 in about 1-2 minutes, the signal strength indicator will show up (to the left of the battery status indicator as shown here). |  |
| Step 6: Now click on Mobile Networks option |  |
| Step 7: In the following screen ensure, "Data enabled" option is switched on. If not, switch it on by selecting the same. |
 |
| Step 8: Now, click on Access Point Names Option |  |
| In the following screen depending upon the USB
Dongle connected if there is an existing APN settings available, the
same will be shown in the list of APNs. OR If no APN settings is shown then skip to Step 14 |
 |
| Step 9: To edit the existing APN click on the same ”. |  |
| Step 10:Enter data card specific Information in the fields provided – Appendix A below has this information for various commonly used dongles. |  |
| Step 11: Once you are done entering the data card specific information, press Menu button |  |
| Step 12: Select the Save option to save the entered settings |  |
| Step 13:
Now, you will see the APN you just created in
the list of APNs as shown here. Select the radio button next to it to
enable it. Once enabled, the radio button will go green as shown
here.
Now skip to Step 17.
|
 |
| Step 14: If no APN settings is shown then click the MENU button |  |
| Step 15: Select “New APN” |  |
| Step 16: Please follow Steps 10-13 |  |
| Step 17:About 1-2 minute's
time after the APN is enabled, the status bar will show the 3G logo as
shown here. This indicates that the internet connection has been
successfully established. Your ME X1 tablet is now connected to the internet. |
 |
| Appendix A For details regarding APN settings details for various Internet Service Providers in India please refer below |
|
 |
|
| Appendix B For the list of supported USB dongles for HCL ME U1 Tab |
|
 | |
Tuesday 28 August 2012
Tuesday 7 August 2012
Basic Computer Configurations and Defense Programs to Start Hacking
This is the 2nd of a series of tutorials on how to start on your hacking journey. So, if you're reading this, you might wanna read first my tutorial about The Basics of Hacking 101. There are lot's of tutorials out here on how to be a hacker, like my first tutorial, so now, let's dive a little bit deeper into the technical aspect as how to be a hacker.
Tonight, we're gonna talk about some basic computer configurations and security measures for you to be safe in your hacking deeds. Well, the cyber-world is similar to the real world, where many crimes are committed everyday, and you don't wanna be the target of stupid skids, and also, you don't want cops outside your door if ever you did something stupid, out of curiosity, of course.
I would like to discuss to you some basic computer configurations, as well as some basic defense programs which you MIGHT like to start with, since I guess these series of tutorials are DEDICATED for new members.
So, let's start.
What is the "Limit" of your Machine?
First of all, before you do anything else, you must know what is the "limit" or capacity of your computer. You should know the basic specifications of your computer like the memory size of the RAM and the HDD, how fast is your processor, how good is your graphics card, etc.
After you've done a background check of your machine, you're now more aware of the limits of your computer, so you know what you CAN do and what you CAN'T do with it, so as not to mess it up.
What are the Essential Software you need to Install in your Machine?
This tutorial is based mainly on the Windows OS, for the very simple reason that it is the MOST COMMONLY USED OS nowadays, so every software that will be discussed here are all compatible for Windows, but not guaranteed for other OS like Macs and Linux (although some of them are compatible).
- Anti-Virus Program
Now, this is your first line of defense, and is really essential for every computer user (even non-hackers). HF users can't bypass it using crypters, but for the sake of this tutorial, I'm adding it up to the list just for maintenance and your first line of defense for skids.
I assume you know the purpose of this program according to its name. So now, I'm just gonna give you links on free and paid AVs that I can consider good.
Free
Avast Free Anti-Virus (Official Site)
Avira Free Anti-Virus (Official Site)
AVG Free Anti-Virus (Official Site)
Paid
ESET NOD32 Anti-Virus (Official Site)
Kaspersky Internet Security (Official Site)
Do note that the paid ones have cracks and exploits all over the Internet, so feel free to use them. However, I really don't recommend them since they might be infected themselves. - Virtual Machine
Nowadays, even AVs, or anti-virus programs are not really effective that effective, because many computer virus/malware/spyware still get past through it. And being a hacker, you're always prone to those nasty things, mainly because, oftentimes, you are now the one creating them.
But, there's a problem. Working with viruses, malware/spyware-creating programs might cause loss of valuable data if you're working with only one main computer. Fortunately, there is a software called Virtual Machine, in which you can create a virtual OS inside your main OS. Unlike dual-booting in Linux, Virtual Machines, or simply VMs, are very flexible, because you can install any type of OS in it. Why do we need to use a VM anyway, when we can REALLY avoid or prevent our main OS to be infected with viruses/malwares/spywares? Well, it's for added security because of its feature that it creates the virtual OS from an isolated part of your hard disk, so once your virtual OS gets infected, you can LITERALLY delete it's "virtual hard drive", then just re-install your virtual OS again. Also, you can configure your VM to have a definite amount of RAM to be shared with the main OS, so that it won't cover up the space needed by the main OS to run itself AND the VM.
The only disadvantage of having a VM is that it eats up a lot of your memory space, so if you don't have the appropriate hardware requirements, it could get a little bit disappointing in terms of its performance.
To install a Virtual Machine, I would highly recommend you use VMWare Player, or you could buy VMWare Workstation.
Here's the link: VMWare Player Download (Official Site) - Sandboxie
Now, after installing VM as your first layer of security for your main OS, it will also serve as your "laboratory", so it must also has it's own defenses.
That's where Sandboxie comes in. Sandboxie, coming from the word "sandbox", is a sandbox program (of course). A sandbox is a program which is used to run other programs in it, especially suspicious programs. It runs the programs on an isolated part of the hard drive, so that once the file is diagnosed as infected, you can easily terminate the program, thus infection will be avoided.
Also, you can install this on your main OS, for the main reason of server testing. You can test your servers on the VM, but it's much better to test the servers in the main OS via Sandboxie, to know if they really work.
Here's the download link for Sandboxie: Sandboxie Download (Official Site) - MalwareBytes
Of course, just for precautions, because you're still new and probably can't fix some infection problems manually, you still need an anti-virus software or a malware-protection software, even if many viruses still get pass through them, they're still worth to have.
MalwareBytes is the choice among the users here in HF, mainly because it doesn't JUST delete your stuffs if it's infected. Well, basically, almost every tool/program for hacking is considered virus/malware/spyware, so regular AVs would just automatically delete them, except MalwareBytes.
Well, this program also used for cleaning your computer with test installs that have been accidentally executed without Sandboxie, or unwanted installs which may be caused by your own curiosity.
Here's the download link for MalwareBytes: MalwareBytes Download (Official Site) - (Optional) COMODO Firewall
For added security, you can also use a separate firewall program besides the essential Windows Firewall. This is ONLY INSTALLED in the main OS, just for added protection.
Here's the link for COMODO Firewall: COMODO Firewall Download (Official Site)
COMODO Firewall is a good monitoring program for outbound and inbound connections. This could give you a sign that you're infected or not. Also, it is compatible with other AVs, so you don't have to worry about software incompatibility. - VPN (Virtual Private Network)
As a hacker, you would want to stay as anonymous as possible whenever you're doing some exploit. Well, basically, you just want to stay anonymous so that you won't have to worry about the cops knocking at your door.
A VPN is used for this kind of purposes. There are many VPNs existing as of today, but only a few are used by members here on HF.
One is CyberGhost. It has a free and paid subscription, so it's up to you to choose. Unfortunately, for free subscription, you can't forward ports, which you'll need when you are using a RAT (Remote Administration Tool).
Another good VPN which have a free subscription is HotSpotShield, although it is not recommended because they keep logs (but to tell you honestly, EVERY VPN KEEPS LOGS, even if they claim they don't, they just delete them from time to time like nVPN). Another thing, if your VPN claims they don't keep logs, it's half true, and even if they don't, their ISP does.
Another free VPN is proXPN, but it also keeps logs, so be careful if you would use it.
Another one is OpenVPN, which is mainly used to download tools/files from survey sites.
Another free VPN is VPNReactor, but if I'm not mistaken, they're also keeping logs, so another caution if you're going to use this VPN.
For paid VPNs, nVPN is good, plus the advantage of it's portforwarding feature. It is mainly used for RATs.
For download of the VPNs mentioned above, here are the links:
CyberGhost VPN Download (Official Site)
HotSpotShield VPN Download (Official Site)
proXPN VPN Download (Official Site)
OpenVPN Download (Official Site)
VPNReactor Download (Official Site)
nVPN Download (Official Site) - WinPatrol
Each program that runs in your computer can be monitored via Task Manager. Unfortunately, virus/malware/spyware nowadays have the ability to hide in the Processes Tab in the Task Manager, or even disguise itself as a system program like svchost.exe, so it's harder to see.
Fortunately, there are programs whose task are only dedicated for monitoring processes of a computer, and a good one is WinPatrol. It gives you a detailed list of every process that runs inside your computer, so you can easily spot any suspicious program.
Here's the link to download WinPatrol: WinPatrol Download (Official Site)
Other Computer Configurations and Reminders
There are some computer configurations that you need to do to achieve the best of your hacking experience.
First of all, especially if you are going to RAT someone, TURN OFF YOUR FIREWALL. Either if it's on your main OS, or the VM, turn it off. It will cause you more trouble when you're learning how to hack, especially when using RAT.
Second. It is okay to have an AV program, but ONLY IN YOUR MAIN OS, not in your VM. The only "cleaner" you can put in your VM is MalwareBytes.
If your computer is not PERSONALLY yours, meaning someone else is using it, I suggest you put EVERYTHING related to hacking inside the VM, and have a password for your virtual OS. It's still better to be safe than sorry.
Last, but certainly not the least...
Quote:You may try to experiment with your computer, but don't do something stupid that you know would put you in a bad state.
Be curious enough to know it, but not always try it.
Saturday 4 August 2012
- You might need to force close the Google Play Store.
Go to Settings
Select: Applications.
Select: Running
Select play store. -May be called Google Play or Google Play Store-
Select: Force Close and Clear Cache.
Hopefully this helps
or
2.set date and time in automatic
or
3. Uninstall latest updates reboot and checkor
4. replace Google Play with other app available
or
5.Ok, if you open the Setting App - choose Accounts & Sync - make sure Background Data is enabled if available, as well as Auto-Sync. Now tap on your Google Account in that list and enable everything.
Now reboot the phone and try
or
6.- Open the Settings App
- Choose Applications
- Choose Manage Applications
- Tap on the All Tab at the top
- Locate and tap on the Google Services Framework app
- Tap on the Clear Data button (your devices data will not be deleted, only the data in this app)
- Tap on the OK button to confirm.
- Reboot the device (turn it completely off and back on)
Hey, this is a method which might come in handy for some of ya.
What you will do is execute a command on cmd (Windows Command Processor) that changes your password without typing in your current one first.
Okay, step 1: Fire up CMD. (Remember to run it as administrator or it won't work)
Type in:
What this does is it executes a command that displays all the names of your windows accounts.
It'll look something like this:
![[Image: Pic1forGuide.png]](http://i1128.photobucket.com/albums/m490/Sonic_chao/Pic1forGuide.png)
Now, type in:
What this does is it tells the computer that you want to change the password of that account.
It'll look like this:
![[Image: Pic2forGuide.png]](http://i1128.photobucket.com/albums/m490/Sonic_chao/Pic2forGuide.png)
After that just type in the new password, then press enter. Type it again, and tadaa!
What you will do is execute a command on cmd (Windows Command Processor) that changes your password without typing in your current one first.
Okay, step 1: Fire up CMD. (Remember to run it as administrator or it won't work)
Type in:
Code:
net userIt'll look something like this:
Now, type in:
Code:
net user (account name here) *What this does is it tells the computer that you want to change the password of that account.
It'll look like this:
After that just type in the new password, then press enter. Type it again, and tadaa!
Wednesday 1 August 2012
Because I work in IT, I end up getting a lot of questions that deal with technical support, such as how do I unfreeze or reset my iPod
device! I’m not sure why so many people have been asking me that
lately, but since they are, I thought I would write up a quick post on
how to go about resetting your iPod if it has frozen up!
Of course telling you how to reset an iPod Nano may work for some, but not for those who have an iPod Touch, so I’ll try to list out the instructions for as many as I can! Here we go!
2. Now press and hold the Menu and Select buttons until the Apple logo appears, which may take about 6 to 10 seconds. You may need to repeat this step.

1. Toggle the Hold switch on and off. (Slide it to Hold, then turn it off again.)
2. Now press and hold the Menu and Select buttons until the Apple logo appears, which may take about 6 to 10 seconds. You may need to repeat this step.
You can also reset an iPod Mini in the same way as the above steps.
2. Then remove the iPod shuffle from the USB dock.
3. Move the switch that is on the top of the iPod shuffle to the off position.
 Note: When iPod shuffle is off, the green stripe by the switch is not visible.
4. Wait 5 seconds.
5. Move the switch back to the on position so green stripe will be visible in either position.
And that’s it! Hopefully, now that you know these steps, you don’t have to keep taking out the battery to unfreeze your iPod! Any comments or questions, make sure to write below! Enjoy!
Of course telling you how to reset an iPod Nano may work for some, but not for those who have an iPod Touch, so I’ll try to list out the instructions for as many as I can! Here we go!
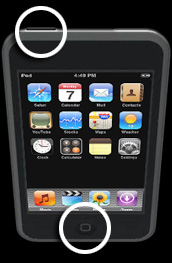
How to unfreeze or reset an iPod Touch
To reset iPod touch, press and hold the Sleep/Wake button and the Home button at the same time until you see the Apple logo show up on the screen:
How to unfreeze or reset an iPod Classic
1. Toggle the Hold switch on and off. (Slide it to Hold, then turn it off again.)2. Now press and hold the Menu and Select buttons until the Apple logo appears, which may take about 6 to 10 seconds. You may need to repeat this step.
Notes:
- If you are having problems resetting the iPod, go ahead and set it on a flat surface. Then make sure the finger pressing the Select button is not touching any part of the click wheel. Also be sure that you are pressing the Menu button towards the outside of the click wheel, not near the center.
- If the above mentioned steps do not work, then you can try connecting your iPod to a power adapter and plug the power adapter into an electrical outlet, or connect the iPod to your computer. Make sure the computer is turned on and isn’t set to go to sleep.
How to reset an iPod Nano (1st, 2nd, and 3rd Generation)
This one is similar to how you would do it for an iPod Classic:1. Toggle the Hold switch on and off. (Slide it to Hold, then turn it off again.)
2. Now press and hold the Menu and Select buttons until the Apple logo appears, which may take about 6 to 10 seconds. You may need to repeat this step.
You can also reset an iPod Mini in the same way as the above steps.
How to reset or unfreeze an iPod Shuffle
1. First , eject your iPod shuffle from iTunes, if you have it connected.2. Then remove the iPod shuffle from the USB dock.
3. Move the switch that is on the top of the iPod shuffle to the off position.
4. Wait 5 seconds.
5. Move the switch back to the on position so green stripe will be visible in either position.
And that’s it! Hopefully, now that you know these steps, you don’t have to keep taking out the battery to unfreeze your iPod! Any comments or questions, make sure to write below! Enjoy!
Are you getting a “USB device not recognized”
error whenever you plug in a USB mouse, keyboard, or other USB device? I
love USB and have 5 ports on my computer so that I can connect my
mouse, keyboard, camera, phone, and printer to it all at once!
However, last weekend, my computer stopped recognizing my USB devices! The strange thing about it was that the USB ports were not bad because all of my devices were still getting power to them. I could still charge my cell phone without a problem!


However, last weekend, my computer stopped recognizing my USB devices! The strange thing about it was that the USB ports were not bad because all of my devices were still getting power to them. I could still charge my cell phone without a problem!

So I started with the normal fixing methods, including
uninstalling the drivers for my devices and reinstalling them. That
didn’t work! Next I tried System Restore thinking that maybe I had installed something and it caused a conflict with the USB system drivers. That didn’t work!
I read online that in order to fix this problem I should go to Device Manager
and uninstall all of the devices under USB Controllers. Restarted the
computer, reinstalled the USB drivers, but the problem STILL did not go
away!
You may also see in Device Manager that the device shows up as an “Unknown Device”.

So how did I finally fix the problem? Well, apparently
it’s a super simple solution! No need to edit the registry, uninstall
drivers, or anything of that sort.
Simply UNPLUG YOUR COMPUTER FROM THE POWER SUPPLY.
Yes that’s it! Note that this does not mean just turning off your
computer because modern computers don’t really turn off when you press
the power button as the motherboard still gets power.
First to explain, the motherboard is where all of
hardware of the computer is connected to, including the USB ports.
Sometimes the motherboard needs to be “rebooted” also because something
can go wrong, i.e. all your USB ports suddenly stop working. The small
microprocessor on the motherboard will reload the drivers and your USB
ports should be back to recognizing all devices!
So first turn off your computer using Shut Down or
pressing the power button and then UNPLUG it from the wall outlet. Let
it sit for about a minute and then plug it back in.
Hope this helps someone fix that pesky “USB device not recognized” Windows error!
I love my iPhone and since I’ve had it for over
2 years, I’ve really learned a lot of cool shortcuts and tricks over
time. Knowing a few handy shortcuts can really save you time as I proved
to my wife recently. A song was playing on her phone and I got a call
on my phone so I asked her to turn off the music. She unlocked the phone
by sliding her finger, then exited the app she was currently in, then
found the Music app, then tapped on Now Playing and then paused the
song!
I was like wow, that only took 10 times longer than it should have taken. Instead, I showed her that she only needed to double-press the Home button and the music control would automatically pop up on the locked screen, no need to even unlock the phone! She was impressed.
Anyway, in addition to that tip, I’ll mention 10 more useful iPhone shortcuts that I pretty much use on a daily basis. There are a lot more, but you’ll only end up using or remembering a couple, so may as well learn the better ones.

In addition, pressing the On/Off button at the top of the phone will send the call to voicemail. So instead of your phone ringing away, just press the top button to send them straight to voicemail.


On the iPhone, just tap the status bar at the very top and you’ll be bought to the very top of the page. Note that you want to tap on the status bar that has the time listed. Saves a lot of finger swiping!

To get rid of the keyboard, you need to tap and swipe down from just above the box where you type in the message like shown below:


Then just press the Call button again and it’ll call that number. So not automatic redial but partial. Don’t use it all the time, but it comes in handy sometimes.


Now when you go to type, click on the small globe icon and you’ll get a whole bunch of awesome emoticons.


And that’s about it! Those are my favorite tips and tricks for the iPhone. Hope you enjoy them. Tell us what your favorite shortcuts are in the comments. Enjoy!
I was like wow, that only took 10 times longer than it should have taken. Instead, I showed her that she only needed to double-press the Home button and the music control would automatically pop up on the locked screen, no need to even unlock the phone! She was impressed.
Anyway, in addition to that tip, I’ll mention 10 more useful iPhone shortcuts that I pretty much use on a daily basis. There are a lot more, but you’ll only end up using or remembering a couple, so may as well learn the better ones.
Tip #1 – Manage Incoming Calls
The iPhone is a phone right, so you probably get a lot of calls. You should probably know that pressing either of the volume controls while the phone is ringing will silence your phone, but continue ringing for the caller. Whether on vibrate or loud, the phone will become completely silent.In addition, pressing the On/Off button at the top of the phone will send the call to voicemail. So instead of your phone ringing away, just press the top button to send them straight to voicemail.
Tip #2 – Scroll to the Top
I can’t even begin to tell you how useful it is to quickly scroll up to the top of a window on the iPhone. Since the screen is so small, you can end up scrolling down a lot when viewing a webpage, reading an email, or sending a text. In Safari, in order to type in a new URL in the address bar, you have to go back to the top. In Messages, you can quickly call or email someone by going to the top.On the iPhone, just tap the status bar at the very top and you’ll be bought to the very top of the page. Note that you want to tap on the status bar that has the time listed. Saves a lot of finger swiping!
Tip #3 – Hide the Keyboard
I’ve always found it majorly annoying in Messages that there is not a button to hide the keyboard. Instead, if you are in landscape mode and have the keyboard up, you can barely read one line of a message conversation:To get rid of the keyboard, you need to tap and swipe down from just above the box where you type in the message like shown below:
Tip #4 – Multitasking
Of course, you should probably already know this one by now, but it’s gotta be mentioned since it’s another one I constantly use. Just double tap the Home button while you’re in any app and the multitasking bar will pop up at the bottom. Then you can switch to another open app by just tapping it. Very useful than exiting the app and then finding the other app and then opening it.Tip #5 – Partial Redial
There’s a neat little trick that I learned by accident when messing with my phone. It’s like redial, but not exactly. Basically, if you go into the Phone app and tap on Keypad and then press the Call button, it will automatically load up the last number you called.Then just press the Call button again and it’ll call that number. So not automatic redial but partial. Don’t use it all the time, but it comes in handy sometimes.
Tip #6 – Caps Lock
Sometimes you need to type something and it has to be in all caps. You can press the Shift arrow key with one finger and type with the other or you can simply double-tap the Shift key and it’ll turn blue and white, meaning that Caps Lock is on.Tip #7 – Zoom into Position
Another super useful trick when typing on your iPhone is the zoom option. A lot of times you have to go back and edit something you typed, but trying to tap with your finger between two characters is half the time impossible and the cursor ends up somewhere else. All you have to do is press and hold your finger over the text and then a magnifier glass will pop up. Slide your finger left or right to move one character left or right at a time. This makes editing text a hundred times easier!Tip #8 – Emoji Icons
Want to type emoticons while writing text messages? Well, they are already built into the iPhone and I didn’t even know this for the longest time. Go to Settings, then General, then Keyboards, then International Keyboard and tap to add Emoji.Now when you go to type, click on the small globe icon and you’ll get a whole bunch of awesome emoticons.
Tip #9 – Open Camera from Lockscreen
One of the newest and most requested features was the ability to open the Camera app from the lock screen. This has been added and all you have to do is slide your finger up from the lock screen to enter the Camera app directly. This has saved me a ton of time and has allowed me to catch some great moments with my kids, which I normally would have missed because it took longer to unlock the phone and find the camera app.Tip #10 – Hide Text Message Content
Even though you can’t hide the fact that you have received a text message, you can at least hide the actual message so someone can’t read that your wife is mad at you because you didn’t talk to her enough the night before! To do this, you just turn off message previews. You can do this by going to Settings, Notifications, Messages and then toggling Show Preview to Off.And that’s about it! Those are my favorite tips and tricks for the iPhone. Hope you enjoy them. Tell us what your favorite shortcuts are in the comments. Enjoy!
Subscribe to:
Posts (Atom)


